Transfer assets with XCM
Please read Substrate to Polkadot SDK page first.
In Open message passing channels, you saw how to open a two-way communication channel between chains by sending messages to the relay chain. You can use a similar strategy to send messages that allow a local chain to manage an account on a remote chain. In this tutorial, parachain B transfers assets into the sovereign account on the relay chain for parachain A.
The outcome for this tutorial is similar to using the transfer function from the balances pallet, except in this case the transfer is initiated by a parachain and demonstrates how the holding register is used when executing the WithdrawAsset and DepositAssetXCM instructions.
Before you begin
Before you begin, verify the following:
- You have set up a parachain test network using Zombienet or a local relay chain using the
rococo-localchain specification. -
You have set up two local or virtual parachains for testing purposes.
For the purposes of this tutorial, parachain A has the unique identifier 1000 and parachain B has the unique identifier 1001.
- You have the Sudo pallet available for both local parachains to use.
- You have opened the message passing channel to allow communication between parachain B and parachain A.
Configure XCM instructions
To illustrate the interaction between the two chains, in the following example, parachain B sends XCM instructions to deposit assets into an account on parachain A.
- Connect to the endpoint for parachain B (1001) using the Polkadot/Substrate Portal.
- Click Developer and select Extrinsics.
- Select sudo, then select sudo(call) to use the Sudo pallet to execute privileged transactions.
- Select polkadotXcm, then select send(dest, message).
-
Specify the destination parameters to indicate the relative location for the message to be delivered.
- The XCM version for specifying the location of the destination: V1
- The relay chain is the destination for the message, so the parent location: 1
- In the context of the parent, the interior setting: Here
- Specify the XCM version for the message (V2).
- Click Add item to construct the message to be executed.
WithdrawAsset instruction
To move assets into the virtual holding register:
- Select WithdrawAsset as the first instruction for this message.
- Click Add item to identify the on-chain assets to withdraw.
- Select Concrete to use the location of the asset to identify the asset to be withdrawn.
- Set parents: 0 and interior: Here to withdraw assets from the parachain B sovereign account on the relay chain.
- Select Fungible to identify the asset as a fungible asset.
-
Specify the total fungible assets to withdraw.
For example, this tutorial uses 12000000000000.
![WithdrawAsset instruction sent from parachain B]()
BuyExecution instruction
To pay for execution from assets deposited in the holding register:
- Click Add item to select BuyExecution as the second instruction for this message.
- Select Concrete to use the location of the asset to identify the asset to be used to pay for executing XCM instructions.
- Set parents: 0 and interior: Here to use the assets withdrawn from the parachain B sovereign account on the relay chain.
- Select Fungible to identify the asset as a fungible asset.
-
Specify the total fungible assets to use.
For example, this tutorial uses 12000000000000.
-
Select Unlimited to skip setting a weight limit for this instruction.
![BuyExecution instruction sent from parachain B]()
DepositAsset instruction
To deposit assets after fees from the holding register into a specific account:
- Click Add item to select DepositAsset as the third instruction for this message.
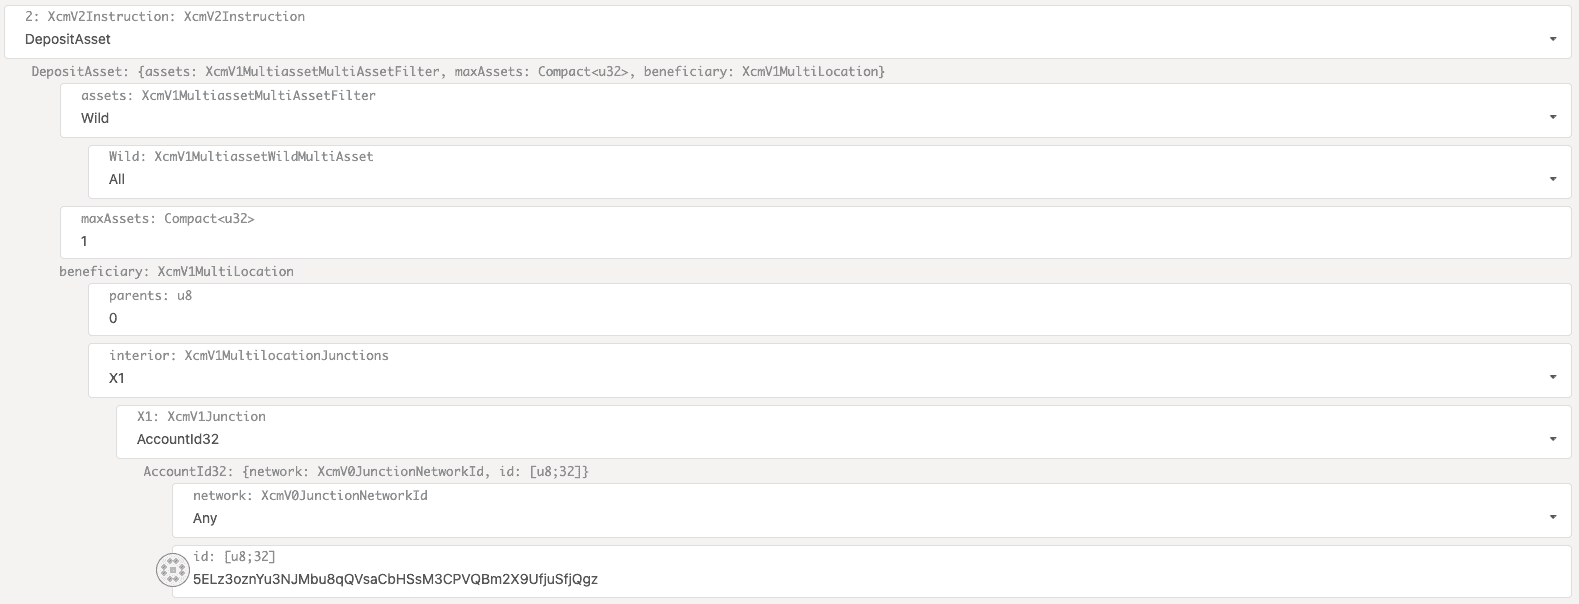
- Select Wild to allow an unspecified number of assets to be deposited.
- Select All to allow all of the remaining assets after fees are paid to be deposited.
-
Set 1 as the maximum number of unique assets to remove from the holding register for the deposit.
In this tutorial, there's only one asset instance available to be removed.
-
Specify the beneficiary to receive the deposited assets.
You can deposit the assets remaining into the sovereign account for parachain A or into a specific account. For this tutorial, the assets are deposited using a specified account address for the previously unfunded account KRIS-PUBS. To select this beneficiary, the DepositAsset instruction looks like this:
![Specify an account as a beneficiary]()
If you want to deposit the assets into the sovereign account for parachain A, you could specify the beneficiary using the following settings:
- parents: 0,
- interior: X1,
- X1 junction: Parachain
- Parachain index: 1000
After you configure all of the XCM instructions to be executed, you're ready to submit the transaction.
Submit the transaction
To submit the transaction:
- Click Submit Transaction.
- Click Sign and Submit.
-
Click Network and select Explorer to verify the message is sent.
If you expand the event, you can review the message instructions. If you click the link to the block that includes the transaction, you can see additional details
Check events on the relay chain
To check the result on the relay chain:
- Open the Polkadot/Substrate Portal and connect to the relay chain.
-
Click Network and select Explorer to view the events for the XCM message.
![Relay chain events]()
-
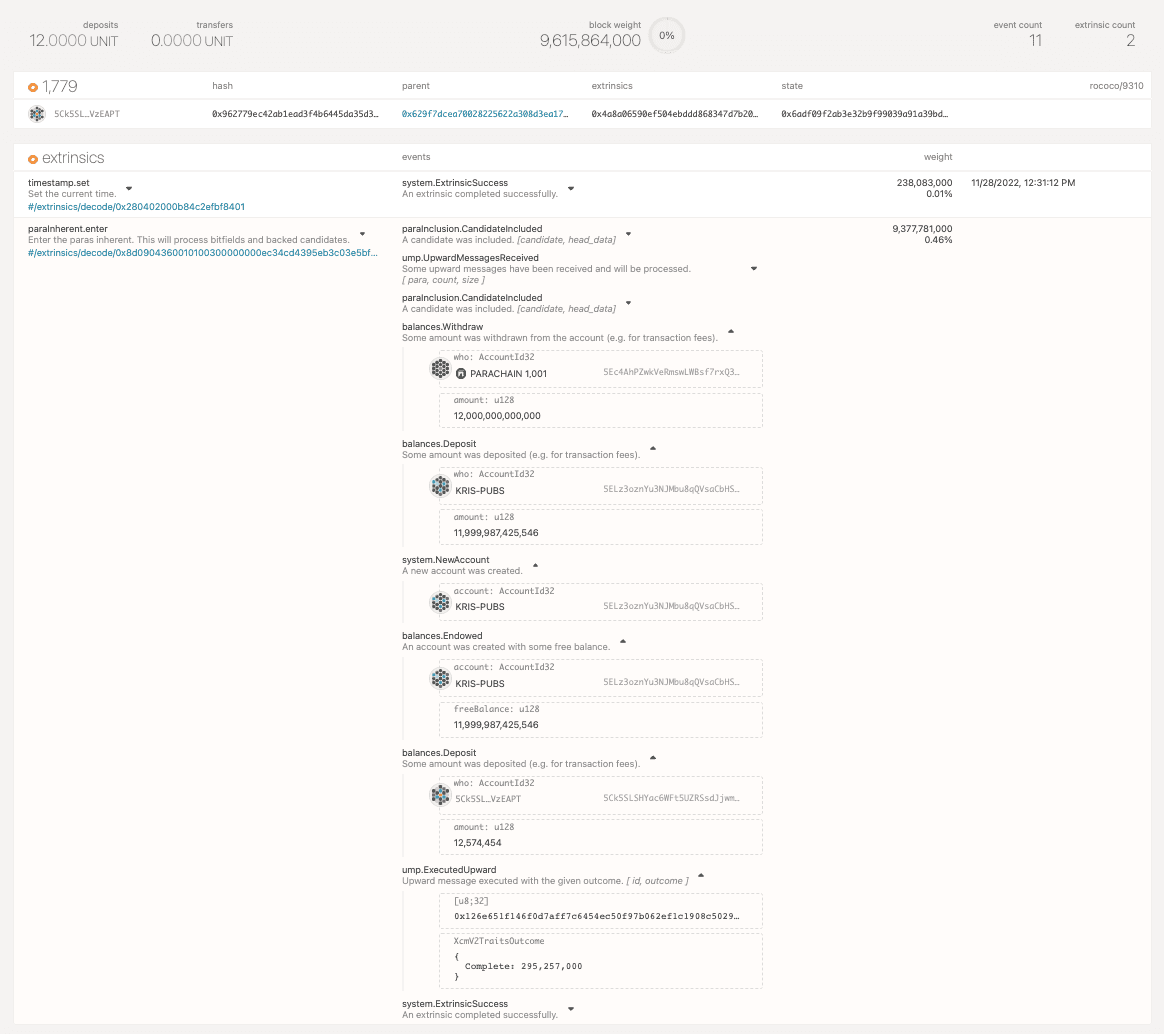
Click the block number where the change was recorded to view details.
![Assets withdrawn and deposited are recorded on the relay chain]()
Check the assets deposited
To verify the assets deposited into the account:
- Open the Polkadot/Substrate Portal and connect to the relay chain.
-
Click Accounts and see the assets minus transaction fees have been deposited into the account.
For example:
![Assets have been deposited in the specified account]()
If you had made the remote transfer to the parachain A (1000) sovereign account instead of the KRIS-PUBS account, you would click Accounts, then select Address book to see the assets withdrawn from the parachain B sovereign account deposited into the parachain A sovereign account.


